IX BACK VOLTON Tutorial
Phase I: Get ready
Phase II: Fit
1: Donning
Don the device over the shoulders like a backpack, position on hips and close hip belt first. Pull tight and stow away loose strap end.
Don the device over the shoulders like a backpack, position on hips and close hip belt first. Pull tight and stow away loose strap end.
2: Align hips
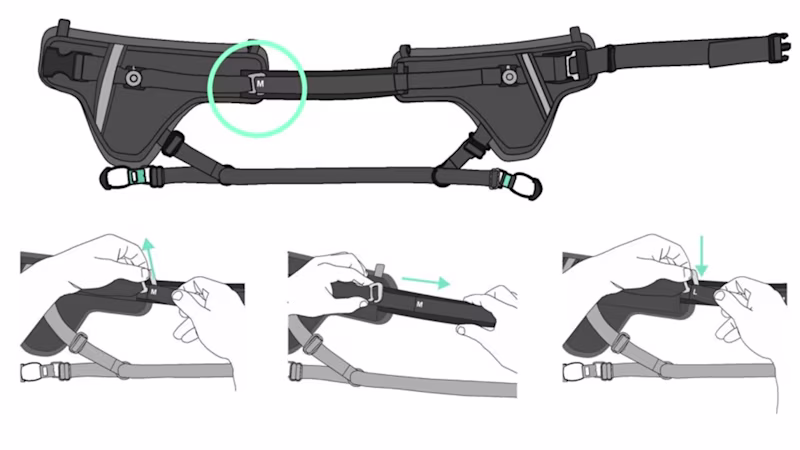
Unlock and open camlock on right side of the hip belt. Grab hip joints and move forward or backwards to align notch with or slighty behind pant seam.
Unlock and open camlock on right side of the hip belt. Grab hip joints and move forward or backwards to align notch with or slighty behind pant seam.

If hip alignment is not possible, please check hip belt circumference in the back of the belt: see “Frame width” below.
If hip alignment is not possible, please check hip belt circumference in the back of the belt: see “Frame width” below.
4: Donning - Close thigh braces

Close thigh braces and adjust strap tension if necessary.
Close thigh braces and adjust strap tension if necessary.
Phase III: Frame adjustments
1: Frame width (S-XX)

2: Frame height (XS-XL)

Adjust the frame height so 1) the HIP BELT can sit on the waist, 2) the frame is straight on the user, 3) the lower chest strap angles downwards when standing straight.
Adjust the frame height so 1) the HIP BELT can sit on the waist, 2) the frame is straight on the user, 3) the lower chest strap angles downwards when standing straight.
3: Frame depth (S-L)
Adjust the frame depth so that the user doesn`t touch the back of the exoskeleton when bending down with the exoskeleton turned off.
Adjust the frame depth so that the user doesn`t touch the back of the exoskeleton when bending down with the exoskeleton turned off.

Adjust both sides equally.
Adjust both sides equally.
4: Position of the thigh brace (S-L)

The optimal position of the thigh braces is centered on the thighs.
The optimal position of the thigh braces is centered on the thighs.
Activate and adjust support
1: Turn ON
Press POWER BUTTON on left and stand relaxed with torso upright. Wait until the thigh brace taps twice for calibration. All LEDs will turn green.
Press POWER BUTTON on left and stand relaxed with torso upright. Wait until the thigh brace taps twice for calibration. All LEDs will turn green.
2: Adjust support level
Rotate SUPPORT LEVEL DIAL to adjust strength (More LEDs = more strength)
Rotate SUPPORT LEVEL DIAL to adjust strength (More LEDs = more strength)
3: Turn OFF
Press and hold POWER BUTTON to turn off.
Press and hold POWER BUTTON to turn off.
4: Doffing
Unclip thigh braces, chest clip and hip belt and take off like a backpack.
Unclip thigh braces, chest clip and hip belt and take off like a backpack.
5: Remove battery
Remove battery prior to storage.
Remove battery prior to storage.
CAUTION: Skipping this step may lead to permanent damage to battery.

Battery Status
Battery Status